An American Southwest Road Trip Itinerary
The desert is calling and I must go.
My American Southwest road trip itinerary takes you through some of the most iconic and must-see places.

The absolute best time to do a southwest road trip is November through February. With that being said, I am a northerner and definitely prefer the cold to the heat. Winter is also the offseason for the area meaning there are fewer people and often rates for cars and hotels are cheaper.
And the absolute best way to do a southwest road trip is to rent a car in Las Vegas and just drive.
Make sure you rent a car with four-wheel drive. You never know when you’ll encounter a road you want to take that says “four-wheel drive only.”

Day One: Las Vegas to St. George
Fly into Las Vegas as early in the morning as possible. You’ll need plenty of time to get your car rental and stop for any necessary supplies before leaving the city.
I always find a Walmart or Target to stock up on sandwich fixings, snacks, and water.
Take I-15 north through St. George, Utah when you leave Las Vegas.

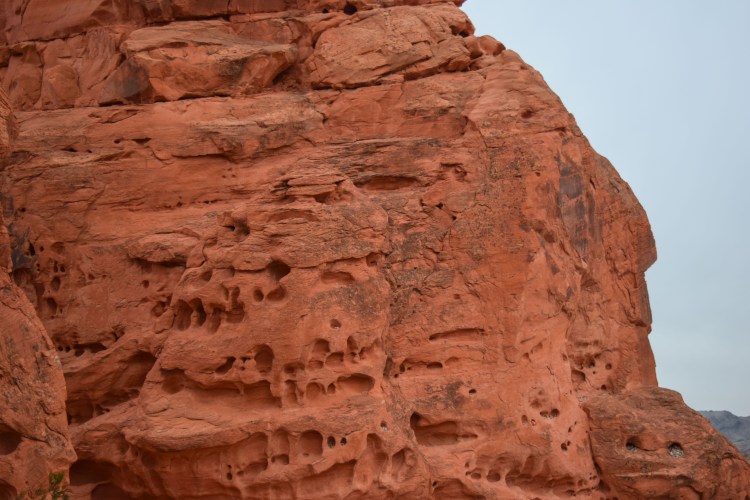
Before you leave Nevada, make sure to take a quick detour through Valley of Fire State Park. You can reach the park by getting off at the Crystal exit and following the signs.
Entrance to the park costs $10 per vehicle and unfortunately, is not covered by an Annual National Park Pass. I knew it wouldn’t be, but I still had to be that person and ask.
PIN THIS:

As soon as you enter the park and see the red sandstone rocks you will know exactly how the park got its name. On a sunny day or a cloudy day, the color is out of this world!
Plan on spending at least an hour, probably two or three to hike.
Don’t forget to stop at the visitors center to learn a little bit about the wildlife that calls the area home. And, if you are like me, to get a sticker for your water bottle/car/laptop/etc.
When you leave the park, you can circle back to I-15 and continue on to St. George where you should have a hotel booked for the night.
Stay at The Inn at Entrada (TripAdvisor – Hotels.com) for the night.
Day Two: St. George to Zion National Park to Page and Horseshoe Bend
Get an early start so you can see and do all that you want to in Zion National Park. I’m not into hiking that much at the moment so I stayed in my car opting for the photo ops within short walking distance of where I parked.
Zion has hikes for every skill level so don’t feel like you have to stay in your car the whole time!

Riverside Walk is one of the easier trails in the park. The path follows the river and is paved making it easy to navigate. At the other end of the mile-long hike is the entrance to the Narrows. People often take a little time to wade around in the water. In total, Riverside Walk is two miles round trip and takes about an hour to an hour and a half.
From Zion National Park, Page is about a two and a half hour drive. On the way, there is also hiking opportunities in the Grand Staircase Escalante National Monument.

Once you get to Page, head south on US 89 to Horseshoe Bend. There will be a small sign and a dirt parking lot at the start of the trail. Normally there are a couple of large tour buses, so you can’t miss it.
The hike to the edge of the canyon is relatively easy and comes in at just under a mile. Be aware that there are no fences anywhere once you get to the lookout point.
Make sure to bring a water bottle with you whether it is summer or winter. And a camera with a wide angle lens if you have it. The bend really is too big to sucessfully capture without a wide angle.

Check into the Lake Powell Resort (TripAdvisor – Hotels.com) for the next two nights.
Day Three: Antelope Canyon and Monument Valley
Today is going to be a busy day full of driving and gorgeous scenery. You definitely don’t want to forget your camera in your room.

Start with breakfast at the Lake Powell Resort. It’s not included in your stay, but they have an amazing omelet station! Plus you get to look out at Wahweap Bay on Lake Powell. Have I told you guys that Lake Powell is one of my favorite places?

First on the agenda should be a tour of lower Antelope Canyon. I went with the standard tour at Ken’s Tours. I had considered doing the photographers tour, but I didn’t want to be in the canyon that long. The standard tour had plenty of photo opportunities to make me and the average photographer very happy.
Read More: Your Complete Guide to Visiting Antelope Canyon


From Antelope Canyon, take AZ 98 to US 163. Eventually, you will end up at Monument Valley. If you want to enter the Navajo Tribal Park portion of the valley that is an extra $20 per vehicle. I’ve never wanted to pay any extra to go in, but it is something I would like to see in the future. All of the “iconic” shots with the road leading straight to the towering rocks can be seen from US 163.


You can drive a little farther on US 163 to see Mexican Hat, a well-balanced rock that looks like an upside down Mexican hat, before heading back to Page for the night.

Day Four: Grand Canyon South Rim and Freemont Street
If you do this trip in the winter, which I highly recommend, the road to the North Rim will be closed due to the snow. Do not try to brave the snow, regardless of what type of car you rented. Head to the South Rim instead.
You can hike all the way to the bottom of the canyon or just little ways down. Be aware that the hiking trail into the canyon does not have a fence.
PIN THIS:

I asked Mom what I should say about the South Rim and she said, “I don’t know. Stay away from the edge. Dragons fly over the canyon, especially at night when they can’t be seen.” So be on the lookout for dragons too, I guess haha! Too funny not to share!

I recommend staying at a hotel on or within walking distance to Fremont Street. I have stayed at the Downtown Grand (TripAdvisor – Hotels.com) and The Fremont (TripAdvisor – Hotels.com) both of them were great hotels.
Next time I will be staying at the Golden Nugget (TripAdvisor – Hotels.com). They have a waterslide that goes through a shark tank and you have to be a guest in order to go down it.
Day Five: Around Las Vegas
Have I ever told you guys that Las Vegas is one of my favorite cities? It’s not because of the usual Vegas things – I’ve been there a couple of times after turning 21 and I haven’t even had an alcoholic drink in the city yet. I need to fix that and soon.
I love Vegas because it is an excellent jumping off point to so many outdoorsy things. If you don’t know I love the great outdoors by now I guess you haven’t been paying attention.
It doesn’t really matter which order you do the outdoorsy things in.

I did Red Rocks Canyon in the morning and of course, forgot to fill the car with gas. The light came on right as I hit the one-way road. It was about 20 miles to the nearest gas station and I panicked the whole way. Don’t do what I did. Make sure your car is full of gas before venturing off to places without gas stations.
I spent an insane amount of time driving around Mt Charleston. It was so much fun exploring the questionable looking roads. Make sure to stop at Desert View Overlook. On a clear day, you can see for miles.


After Mt. Charleston I made my way back through Valley of Fire State Park (because it is just so gorgeous I couldn’t stay away) to get to Lake Mead and the Hoover Dam.
If you plan everything just right you should be able to make it back to Las Vegas in time to see a show that night or spend another night on Freemont Street.
Bonus Day Six: Death Valley National Park
If you have extra time, Death Valley is a great last stop in the desert.
Stop in Shoshone, California right before entering the park. The small town might not look like much, but in Dublin Gulch is where you can see cliff dwellings carved into a thick layer of ash that was deposited from the last eruption of Yellowstone a long time ago. The rock homes were in use until the 1970s. You are allowed to wander inside the structures.


From Shoshone, take US 178 into Death Valley. The road will take you past many of the major, must-see places within the national park.
Make a quick stop at Badwater Basin, the lowest point in North America at 282 feet below sea level. Be sure to check the thermostat on your car as the lower you go in elevation, the hotter it gets. Other places you want to see within the park are Zabriskie Point, Dante’s View, Devil’s Golf Course, Mesquite Flat Sand Dunes, and if you have time Racetrack Playa.

Even though the place is called “Death” Valley, be on the lookout for life. If you are searching for it, you will be amazing at how alive the valley really is.

If you plan on staying the night in the park, there are a couple of hotels at Furnace Creek. I recommend staying at The Ranch at Death Valley (TripAdvisor – Hotels.com). It is centrally located in Furnace Creek and their pool is fantastic after a long day out exploring.
Must-Haves for Exploring the Desert
Annual National Park Pass – If you pay individually at all the places managed by the National Park Service you’ll spend $165 in entrance fees. An annual pass costs $80 and is valid for 12 months after the purchase date. You never know where you’ll end up in 12 months. Get the annual pass.
Water Bottle – You will need water in the desert. Bring one.
Camelbak – For any extended hiking you’ll want to carry a water bladder in a backpack. It’s so much easier to just suck on the tube as you walk and get thirsty than have to stop every time to dig out a water bottle.
Sun Screen – The desert is sunny. The sun burns your skin. You don’t want to look like a lobster. Bring sunscreen and rub it in. I didn’t rub it in once and ended up with sunburnt stripes on both arms ????
Road Atlas – You should always have a paper map and not solely rely on technology. I’ve relied on technology too much one time and it died on me. Needless to say, I got lost.
Extra Water – I usually stop at a Walmart and pick up a couple gallons before venturing away from civilization.
Hiking Boots – If you are going to be doing any hiking, you’ll want a good sturdy pair of shoes.
Have you been to the American Southwest? What was your favorite part? If not, would you like to go?

Don’t forget to pin this post to your favorite travel or road trip board!


