How to Build a DIY Desk
I’m a DIYer. I love to make things versus buying them. Remember when I made a futon for my car?
One Friday night while scrolling through Pinterest I saw a DIY desk and I loved it. By mid-morning on Saturday, I was at the home improvement store buying the necessary items to create my latest masterpiece.

Pipes should be 3/4″ in diameter. You could also use 1/2″ pipes if you want to go a little bit cheaper, but the desk will not be as sturdy.
- 8 – floor flanges
- 2 – 18″ pipes
- 4 – 24″ pipes (I’m tall and wanted a slightly taller desk. If you want to make it a shorter more standard height desk, go with 4 more 18″ pipes)
- 2- 2″ pipes
- 4 – 4″ pipes (if you want to make it shorter, buy 4 – 6″ pipes)
- 4 – T joints
- 3 – 6x10x2 boards (I used pine, but you can use whatever kind of wood you want)
- 1 – 1x4x6 board (cut into three equal 2′ long sections)
- 1 – Half pint wood stain (I used Varthane Gunstock)
- 1 – Quart sealant (I used Minwax Polyacrylic Clear Satin, also comes in matte and high gloss)
- 1 – Can metal spray paint (I used Rustoleum Venetian Bronze)
- Screws –

- Sawhorses (not necessary, but REALLY helpful)
- Drill (Ain’t nobody got time to be using a screwdriver)
- Belt sander
- Sandpaper
- Gloves and rag for stain
- Paintbrush for sealant
Picking Your Wood
While at the home store picking up all your supplies, the work really starts when you’re looking at the boards. You want to get wood that is unblemished. Wood knots are okay, but make sure there are no crack through the board and nothing that would make your desk look weird. You also want to make sure your boards are straight.

I ran into trouble finding three boards that I liked. One was okay, but it had a rougher part on one side that would have ruined the tabletop. I put the bad side on the bottom of the table. So keep that in mind if the store is short on boards.
Cleaning Your Pipes
These pipes are oily and gross. They left an awful oily black residue on my hands. Before you do anything with them, they need to be cleaned. I used an old ice cream pail filled with warm soapy water (Dawn dish soap for the win) and an old rag to wipe them down. After they were wiped off, I let them air dry.

Assembling Your Tabletop
This is where the sawhorses come in incredibly handy. You can use the legs as a support so you aren’t working on the ground.

Your first step is going to be choosing which side of your boards will be the top of your table. Any blemishes you can’t sand out on the boards should be on the underside of the table. Don’t flip a board over just because of the knots as they’ll give the top of your table a little bit of character.
After you have decided on which side of the boards you want as your top, you’ll need to secure them together with your three two-foot sections of the 1x4x6. I eyeballed mine, so I can’t really give you any measurements. The only thing you need to make sure of is that the floor flanges are sitting on the 2x10x6 boards.

I did end up cutting the boards so they were a little shorter on the one end because they didn’t match up! Hopefully, you pick better boards than I did!
Sanding

Sanding the table was definitely the least fun. However, I learned the hard way in college that you need to sand your wood before you stain it. There really is no way around it.
I think the most stressful part of sanding was worrying about not sanding it enough and at the same time worried I was sanding too much.
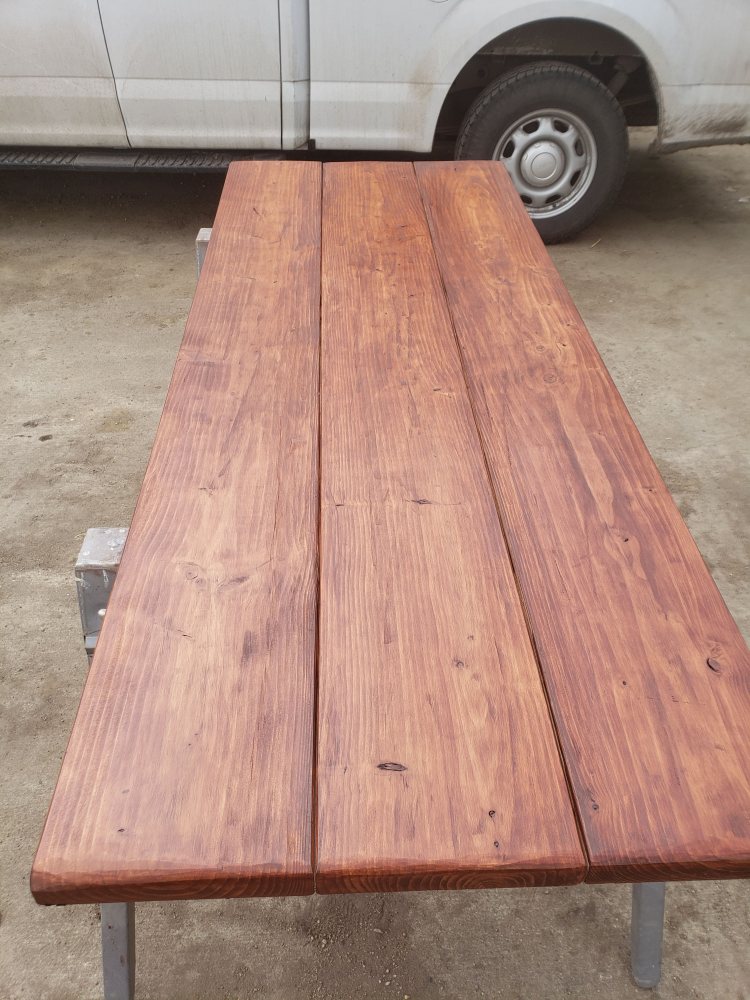
It’s a little ripply and you can see the sand marks in it, but that’s what makes it one of a kind and mine!
Staining and Sealing
Make sure you are wearing rubber gloves for this.

This was the fun part! Once I finally settled on a color. I bought three different colors and had to try them all before choosing Gunstock.
I ended up doing three coats of stain before the color was perfect.
When you are finally happy with the color of your table top you are ready to seal it. I got a waterbased sealant which was so much easier to clean up than polyurethane has been for past projects.
Follow the directions on your sealant for drying times and put three coats on.
Assembling the pipes
While your sealant is drying, it’s a good idea to start piecing your pipes together.
I tried drawing a diagram of how I assembled them and when I was done, the picture didn’t look anything like desk legs 😅 The best way to show you how to assemble them is to look at the original picture where I got my idea off Pinterest.

In this picture, you can see where the t-joints are placed. The pipe horizontal to the ground going from front to back is the 18-inch pipe with a t-joint and a 2-inch pipe before connecting to the back leg.

The only thing the picture doesn’t show is the 8-floor flanges and they connect the legs to the table and give the table a bit more stability on the floor. Be aware that if you have white or any light-colored carpet, they will stain. I have scrap linoleum that was cut into circles to protects the carpet.

Painting the Legs
I went back and forth on whether or not I should paint the legs for a few days. Once they were assembled, it was a very easy decision. And now that it’s finished, I’m incredibly happy with my choice to paint them. It really completed the finished look.

I used one spray can of Rustoleum Venitian Bronze and I had just enough to cover all the pipes.
Make sure you remember to get the labels and adhesive off the pipes before you paint them. A razor works amazingly to get the stickers off and adhesive remover (WEAR GLOVES!) worked perfectly to get rid of the excess adhesive.
Assembling your table


Screw the legs into the bottom of the table and…
You’re finished!


Have you ever built a desk or table for your house? How did it go? Are you happy with your finished product?
Share if you decide to make your own desk!


Don’t forget to pin this post and share it with your crafty friends!


